Bathroom Waterproofing Methods That Protect Walls Floors and Structural Materials From Hidden Water Damage
A bathroom can look perfect while water quietly destroys what sits behind the tiles. Moisture slips through tiny gaps, soaks into backer board and timber, and feeds mould inside the wall. By the time you notice a musty smell, soft flooring, or a ceiling stain below, the repair is often a strip-out, not a tube of caulk.
Good waterproofing prevents that story. It is a system of membranes, sealed joints, sloped surfaces, and maintained finishes that keeps water on the surface, moving toward the drain. The methods below protect walls, floors, and structure for decades.
How Hidden Water Damage Starts
Water rarely enters through one dramatic hole. It enters through dozens of small weaknesses working together. Grout is porous, not waterproof, and many tiles absorb some water too. Every shower sends water across grout lines, into corners, and behind the finish along the path of least resistance.
Once behind the tile, moisture has nowhere to dry. It wicks into cement board, plasterboard, plywood, and studs. Timber that stays above about 20 percent moisture content can rot, metal fasteners corrode, and adhesives soften so tiles loosen and open the gaps wider.
The most vulnerable places are predictable:
- Inside corners, and where walls meet the floor or tub edge
- Around shower valves, showerheads, taps, and supply lines
- At the drain, where the floor membrane must join without a break
- Along a bathtub or shower tray edge that was never properly sealed
- Behind a toilet, where a slow seal leak can run unnoticed for months
Replacing a rotten subfloor and reframing a shower can cost $3,000 to $8,000 or more. Adding proper waterproofing during a planned renovation typically adds $500 to $1,500 — a fraction of the rebuild.
Waterproofing Shower Walls
Shower walls take the most direct water, so they need a continuous waterproof layer behind the tile, not just water-resistant board. Start with a proper substrate such as cement backer board or foam tile backer board, fixed with corrosion-resistant screws. Green plasterboard alone is not enough.
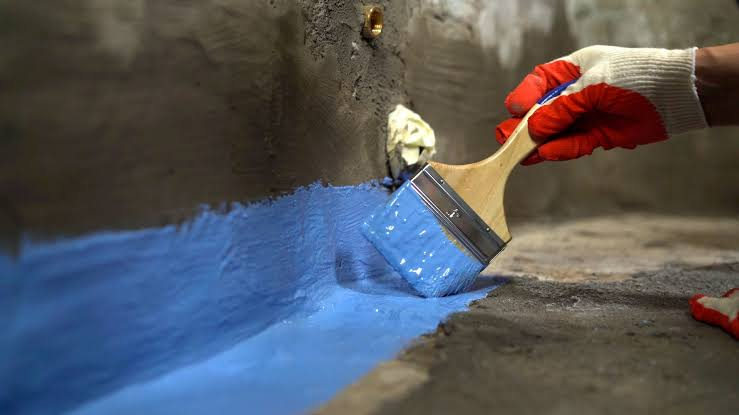
Apply waterproofing over that board before tiling. With a liquid-applied membrane, roll on two coats to the manufacturer’s specified thickness, embedding reinforcing tape into every inside corner and board joint while the first coat is wet. Take it at least as high as the showerhead, and to the ceiling in a steam shower. With a sheet membrane, bond it fully, overlap seams by the specified amount — often about 50mm — and seal them.
Details That Make Shower Walls Last
Corners fail more often than flat walls, so never fill a change of plane with rigid grout. Use flexible sealant there, plus pre-formed corner pieces with sheet systems. Around the valve and showerhead arm, fit sealing collars or a neat ring of membrane and compatible sealant so water cannot track behind the cover plate. Slope a niche shelf slightly toward the room so water does not pool. At a tub, lap the membrane to the flange and finish the joint with sanitary silicone, not grout, because it moves as the tub fills.
Waterproofing Floors
A bathroom floor must handle splashes, overflows, toilet leaks, and, in a tiled shower, constant flow to the drain. The goal is a sealed tray under the finish that keeps stray water away from timber and subfloor materials.
Start with a sound subfloor: thick, dry, and rigid. Flex cracks grout and breaks membrane bonds, so screw down loose boards and replace soft sections. Apply the membrane across the whole wet area, turning it up the walls by at least 100 to 150mm. In a wet room or curbless shower, extend it across the entire floor.
Slope is essential. A shower floor should fall to the drain at roughly 1 in 40 to 1 in 50 — about 25mm per metre — so water does not pond. At the drain, use the bonding or clamping flange designed for your system. This is the floor’s most important detail; a poor drain connection will still leak.
- Confirm the subfloor is dry before you start — never seal moisture in
- Run the membrane up walls and door thresholds, and around pipe penetrations
- Use the compatible drain flange and install it exactly as directed
- Protect the finished membrane from dropped tools and grit until tiling
Sealing Around Fixtures and Penetrations
Every pipe and fitting through a waterproof layer is a potential leak. The rule is simple: if it penetrates the membrane, it must be sealed to the membrane. Pipe collars and sleeves made for your system cost only about $10 to $30 each and are worth it. Where no collar fits, cut the membrane tightly and seal with the manufacturer-approved sealant.
Around tubs and shower trays, combine a sealing strip or upstand on the tray edge, embedded in the wall finish, with a visible joint of high-quality sanitary silicone containing a mould inhibitor. Apply it to a clean, dry joint, tool it smooth in one pass, and let it cure fully — usually 24 hours — before showering.
Toilets and basins need the same care. Replace the toilet wax ring or rubber seal whenever the toilet is lifted, and dry-test supply connectors with a tissue after flushing several times. Under basins, seal around penetrations and never ignore a slow drip hidden by a cabinet — that is how vanity floors rot.
Choosing Waterproofing Membranes
There is no single best membrane for every bathroom. The right choice depends on substrate, budget, and timeline. Use one complete, compatible system — board, membrane, tape, corners, and drain — rather than mixing brands.
Liquid-Applied Membranes
These are rolled on like thick paint and cure into a flexible layer. They cost about $100 to $250 for a standard shower and handle awkward shapes easily. Their weakness is consistency: too thin, and pinholes remain. Apply two coats and respect curing times.
Sheet Membranes
Sheet systems are rolls of waterproof fabric bonded to walls and floors, joined with bands and corners. They give factory-controlled thickness and suit wet rooms well. Materials cost more, often $300 to $600 for a shower, and seams need careful work.
Foam Board and Cementitious Systems
Foam backer boards with a factory waterproof face combine substrate and waterproofing in one step, though you still seal every joint and screw head. They are light and easy to cut. Cementitious coatings bond well to concrete but are less flexible, so they suit stable concrete better than timber floors. When in doubt, choose the system your tiler installs most often.
Grout and Caulk Maintenance
Even the best membrane needs a maintained finish above it. Grout and caulk are not the primary waterproofing, but when they fail, far more water reaches the membrane and mould thrives on the surface.
Inspect grout twice a year for cracks and gaps, especially in corners and around the base. Rake out damaged areas and regrout them. Epoxy grout offers better resistance in busy showers, though it costs more. Cement grout benefits from a penetrating sealer every one to two years — a $20 to $40 bottle — but sealer does not make grout waterproof.
- Replace shower and tub silicone every 3 to 5 years, or sooner if it peels, splits, or blackens
- Remove old silicone fully — new sealant will not bond reliably to old
- Squeegee shower walls after use so water does not sit on grout lines
- Fix small grout cracks promptly, before they become entry points
Never caulk over mouldy, wet sealant. Cut it out, clean the joint, let it dry completely, then reseal. If mould returns in the same spot within weeks, moisture is likely trapped behind the finish.
Testing and Inspection
Testing before tiles go on separates a hopeful installation from a proven one. For a shower base or wet-room floor, do a flood test: plug the drain, fill the base to just below the threshold, mark the level, and leave it for 24 hours. A noticeable drop, or dampness on joists or the ceiling below, means find and fix the leak before tiling. Some codes and warranties require this test, with photo evidence.
For walls, inspect every seam, corner, and penetration while the membrane is fresh. A bright light at a low angle reveals pinholes and thin spots. A moisture meter on framing before closing up gives a useful baseline.
After completion, check once or twice a year: run the shower, then look below, behind access panels, inside the vanity, and around the toilet base, and feel floors for softness. Catching a failed seal then is an afternoon job.
Final Thoughts
Bathroom waterproofing is invisible when it works, and that is the point. You will live with its benefits daily: solid floors, sound walls, and no musty odours. Think system, not single product — a continuous membrane, sealed corners and penetrations, a connected drain, proper slope, and maintained grout and silicone.
Fund waterproofing before upgrading a tap or tile: premium finishes over poor waterproofing are money at risk, while modest tiles over an excellent membrane can last decades. If you hire it out, ask: how will you waterproof this room, and how will you test it before tiling? A good installer will answer clearly.
Frequently Asked Questions
Is grout waterproof, or do I still need a membrane behind tile?
Grout is not waterproof. Cement grout is porous and passes water, and even epoxy grout is only part of the finish. Any shower or wet area needs a continuous membrane behind the tile to protect walls and floors when water inevitably gets through.
How much does bathroom waterproofing cost?
For a standard shower, expect about $500 to $1,500 for materials and labour. A full wet room costs more. It is a small share of a typical $10,000 to $25,000 renovation — and far less than repairing rot.
Can I waterproof over existing tiles?
Some liquid systems can go over sound, well-bonded tiles before retiling. But if water has already reached the substrate, covering it seals in damp and damage. If tiles are loose, the floor feels soft, or a musty smell persists, remove the finish and inspect first.
How long does bathroom waterproofing last?
A correctly installed membrane should last the life of the tiled finish, often 20 to 25 years or more, because tile protects it. The ageing parts are visible ones: silicone usually needs replacing every 3 to 5 years, and grout may need repair or resealing over time.
Should I waterproof the whole bathroom floor or just the shower?
At minimum, waterproof the shower, around the tub, and the floor in front of them, turned up the walls. For timber floors, upstairs bathrooms, and wet rooms, waterproofing the entire floor is strongly recommended and required by code in some regions, for modest extra cost.